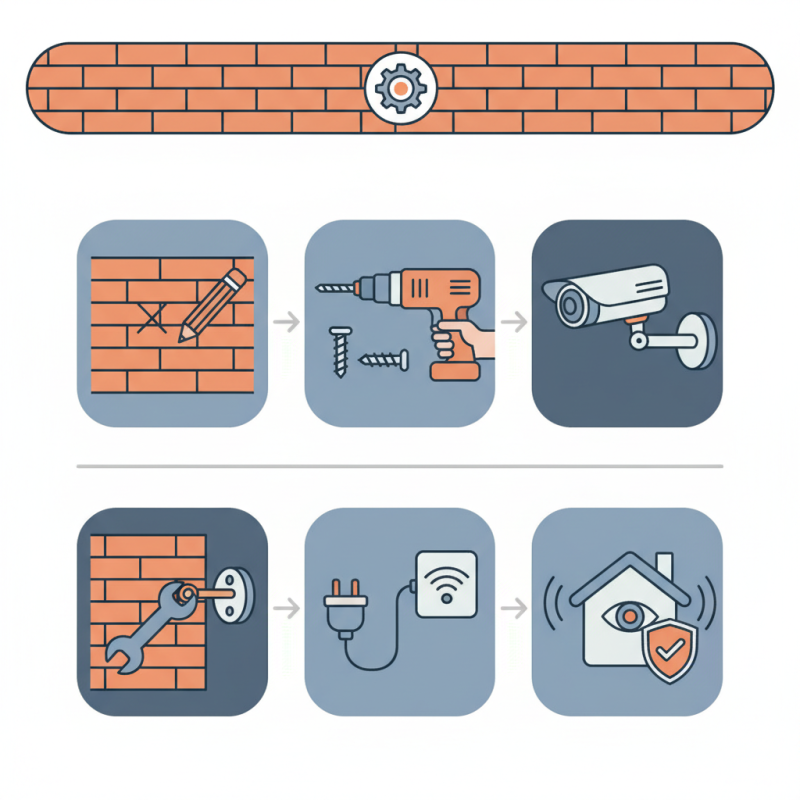
Installing a security camera on a brick wall may seem daunting. However, with the right tools and approach, it can be straightforward. Understanding how to install a security camera on a brick wall requires basic knowledge of hardware and installation techniques.
You will need a drill, anchors, and screws specifically designed for brick. It’s best to plan your camera placement carefully. Consider the view you'd like to capture and the power source. Improper installation may lead to camera malfunction. If unsure, consult an installation professional.
Mistakes can happen if you rush through the process. Take your time to ensure accuracy. A secure camera will provide peace of mind. Following the correct steps ensures durability and reliability in monitoring your property.
Choosing the Right Security Camera for Brick Wall Installation
When it comes to installing a security camera on a brick wall, choosing the right device is crucial. First, consider the camera's
resolution. A higher resolution provides clearer images, especially for identifying faces or license plates. Look for options that offer at least 1080p HD quality.
Next, evaluate the weather resistance. A durable camera can withstand various environmental conditions. Opt for models with an IP66 rating or higher. This rating ensures protection against dust and strong water jets.
Tips: Always check the camera's field of view. A wider angle covers more area and reduces the number of cameras needed.
The type of power supply is important too. Some cameras run on batteries, while others require wired connections. Wired models usually provide a more stable feed but can be complex to install.
Finally, think about the storage options. Cloud storage offers ease of access, but local storage can be more secure. Weigh the pros and cons according to your specific needs. Remember, every choice impacts your camera's effectiveness.
Essential Tools and Materials Needed for Installation
When planning to install a security camera on a brick wall, it’s crucial to have the right tools and materials. According to the National Institute of Justice, proper installation can increase the effectiveness of security systems by up to 40%. Begin with a power drill equipped with brick drill bits. These bits are designed to handle tough materials. A level will help in ensuring that your camera is perfectly aligned for optimal coverage.
You'll need masonry screws or anchors suitable for brick. These fixtures provide the necessary support, especially in outdoor conditions. Additionally, having a caulking gun and weatherproof sealant can help protect your installation from moisture, which can damage electrical components. The Bureau of Justice Statistics notes that about 60% of U.S. households faced property crimes in the last five years. Reliable equipment is essential to deter these threats effectively.
Beyond tools and materials, consider safety gear. Wearing safety glasses ensures protection from flying debris, while gloves can prevent cuts. Many overlook the importance of preparing the area. Cleaning the brick surface will improve adhesion and stability of the screws. It's also easy to miss that insufficiently drilled holes can lead to loose cameras. Taking the time to prepare correctly makes a significant difference in long-term functionality.
Step-by-Step Guide to Preparing the Brick Wall Surface
Preparing the brick wall surface for a security camera installation is crucial. A clean and even surface ensures stability and functionality.
Start by inspecting the wall for any cracks or loose bricks. Fill any gaps with a concrete patch. This prevents moisture from getting behind your camera, protecting its integrity.
Next, clean the wall thoroughly. Use a wire brush to remove any dust or debris. A power washer can be helpful to clear tough grime.
After cleaning, dry the surface completely. Moisture can hinder adhesion, leading to potential issues later. Once dry, you may consider using a leveling compound if the surface is uneven. Uneven surfaces can lead to camera misalignment.
Lastly, mark the desired camera placement before drilling. Ensure it's at a height that covers the area you want to monitor.
Take a step back and reassess your marking several times. Small miscalculations can lead to poor angles, impacting the camera's effectiveness. Prepare well, and your camera will serve its purpose without complications.
Techniques for Mounting the Camera Securely on Brick
Mounting a security camera on a brick wall can seem daunting. However, with the right techniques, it becomes manageable. According to the Security Industry Association, over 60% of burglaries occur in residential areas. This highlights the importance of proper surveillance.
Start by choosing the right anchor for your camera. Use masonry screws or expansion anchors specifically designed for brick. Regular screws may not hold under outdoor conditions. Drill a hole for the anchor, ensuring it matches the size of your anchor. Failure to do this can lead to weak mounting, jeopardizing your camera's stability. Remember, testing the mount's strength is crucial after installation.
Consider the camera's position. Aim for a height of 8-10 feet for best coverage. Yet, avoid installing it too high. A camera positioned too high might not capture clear images, especially of faces. Research from the International Foundation for Protection Officers suggests that effective camera positioning increases identification success rates by nearly 30%. Ensure you maintain a clear line of sight, free from obstructions. Overcomplicating the setup can lead to unnecessary errors. Take time to plan out the installation for more reliable surveillance.
Testing and Adjusting Camera Angle for Optimal Coverage
When installing a security camera on a brick wall, ensuring the
optimal angle
for coverage is crucial. According to a recent industry report, over
80% of home burglaries occur
when a property is not visibly monitored. This underscores the
importance of having a well-placed camera that captures every angle
of entry and movement.
Start by determining the most critical areas that require oversight.
Is it the front door, the garage, or a side window? A strategic
placement can make a difference. Use a test video to analyze the
camera’s field of view. This step helps identify blind spots. It’s
important
to view the footage during different times of day, as lighting can vary
significantly. For instance, low light can
obscure details, making the angle adjustment more essential.
Once you find a suitable position, securing the camera is necessary.
However, many users fail to double-check the stability of their
installation. Regular maintenance is vital for
long-term operation.
A study found that nearly 30%
of homeowners neglect this routine, which can lead to diminished coverage.
Make necessary adjustments based on the camera's performance.
Over time, you may need to re-evaluate the angle to keep up with
changing environmental factors, ensuring continued security for
your home.
Conclusion
Installing a security camera on a brick wall can be a straightforward process if you follow specific steps. First, it’s essential to choose the right security camera that fits your specific needs, ensuring it has the necessary features for outdoor use. You'll also need to gather essential tools and materials such as a masonry drill, anchors, and screws, which are crucial for a secure installation.
Once you have everything ready, prepare the brick wall surface by cleaning it and marking the desired camera placement. The next step involves using appropriate techniques to mount the camera securely on the brick, ensuring it stays in place for long-term use. Finally, it's important to test and adjust the camera angle to achieve optimal coverage of the area you intend to monitor. By following this structured guide, you will successfully learn how to install a security camera on a brick wall while ensuring durability and effectiveness.